On the way day day up...

nginx 5xx 状态码分析

最近查了一个线上页面503的问题,对nginx各种状态有了进一步的了解,简单的总结下。

由于现在的开发语言为python,所以拿nginx+uwsgi进行举例说明。

主要讲 504、502、499对应的场景

一个http请求处理流程

Alt text

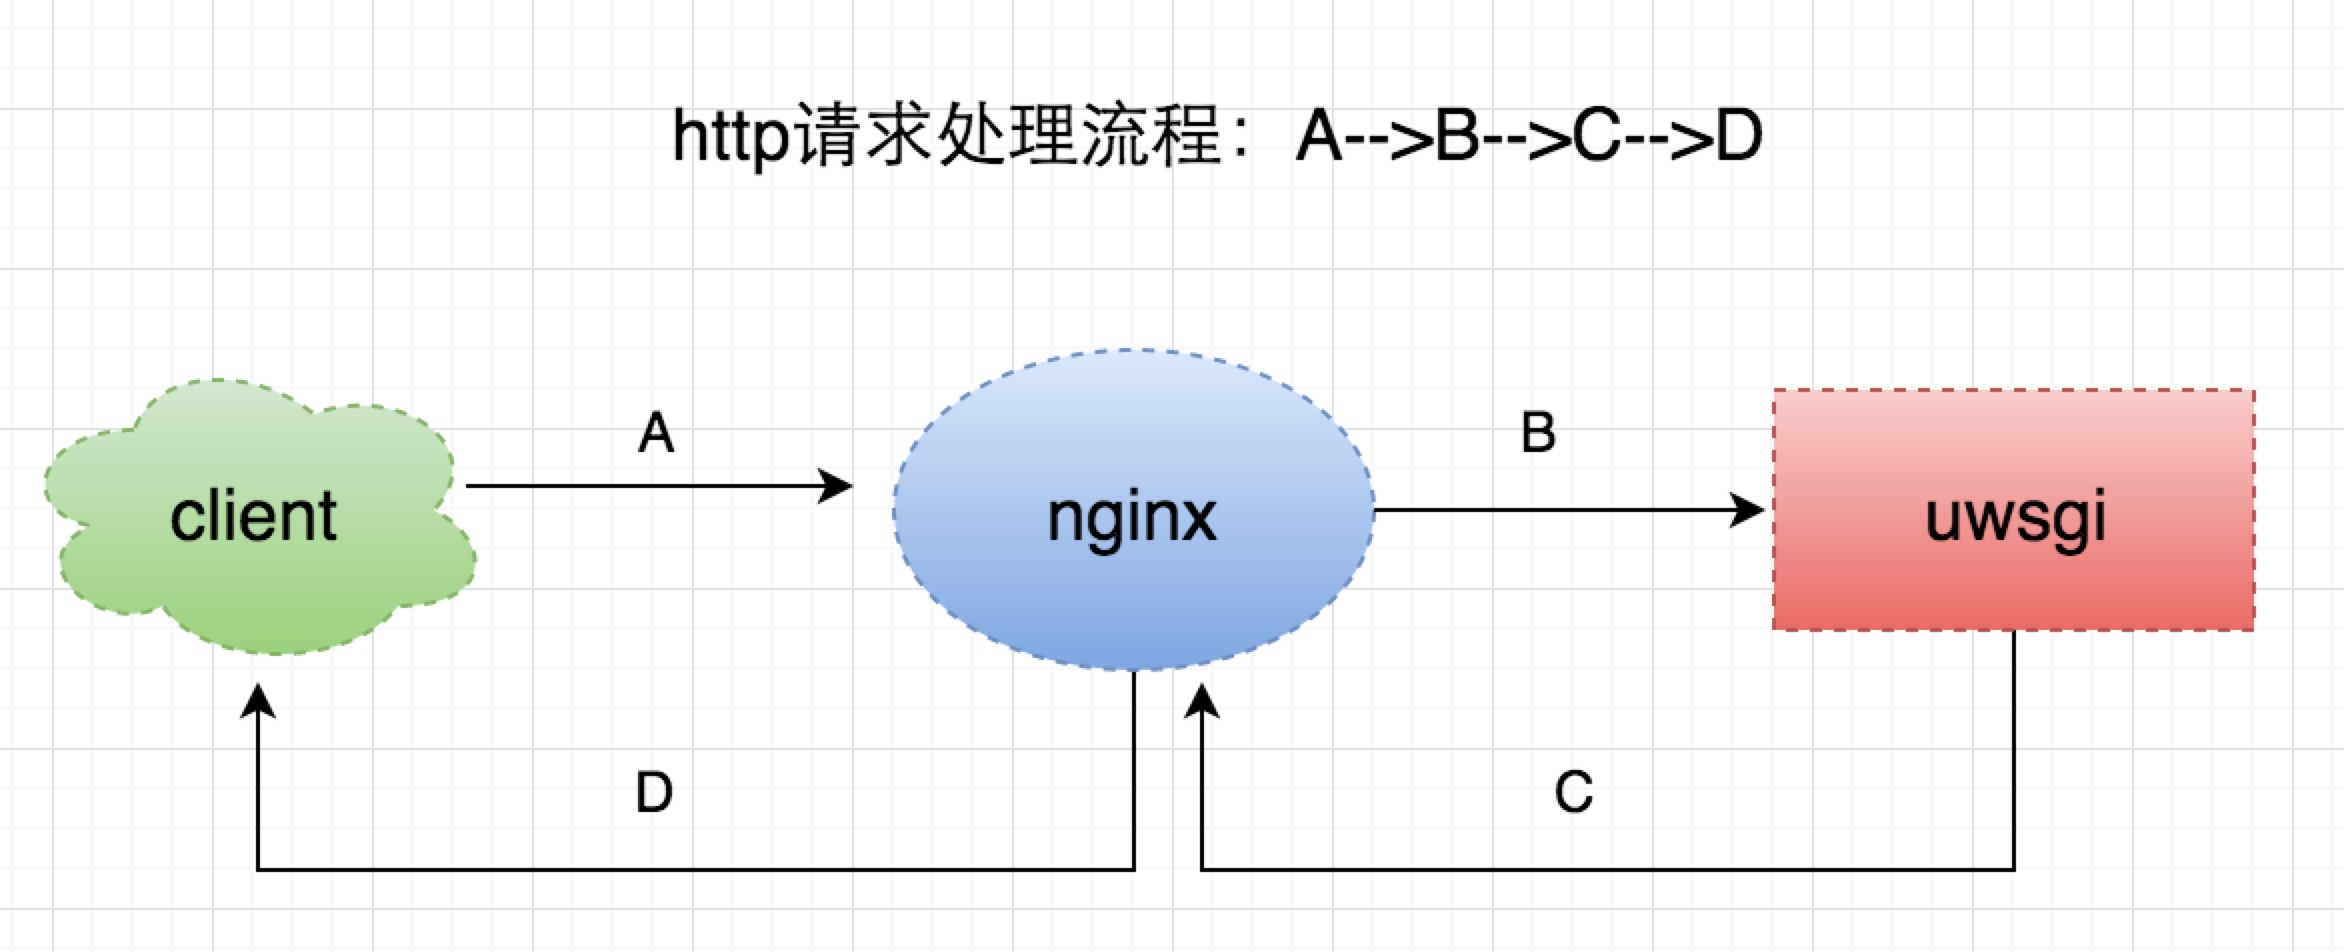
一个普通的http请求处理流程,如上图所示: A client端发起请求给nginx B nginx处理后,将请求转发到uwsgi,并等待结果 C uwsgi处理完请求后,返回数据给nginx D nginx将处理结果返回给客户端 每个阶段都会有一个预设的超时时间,由于网络、机器负载、代码异常等等各种原因,如果某个阶段没有在预期的时间内正常返回,就会导致这次请求异常,进而产生不同的状态码。

504

504主要是针对B、C阶段

一般我们的nginx配置中会有

location / {
	...
	uwsgi_connect_timeout 6s;
    uwsgi_send_timeout 6s;
    uwsgi_read_timeout 10s; 
    uwsgi_buffering on;
    uwsgi_buffers 80 16k; 
	...
}

这个代表nginx与上游服务器(uwsgi)通信的超时时间,也就是说,如果在这个时间内,uwsgi没有响应,则认为这次请求超时,返回504状态码。

具体的日志如下:

access_log

[16/May/2016:22:11:38 +0800] 10.4.31.56 201605162211280100040310561523 15231401463407888908 10.*.*.* 127.0.0.1:8500 "GET /api/media_article_list/?count=10&source_type=0&status=all&from_time=0&item_id=0&flag=2&_=1463407896337 HTTP/1.1" 504 **.***.com **.**.**.39, **.**.**.60 10.000 10.000 "Mozilla/5.0 (Windows NT 10.0; WOW64) AppleWebKit/537.36 (KHTML, like Gecko) Chrome/46.0.2490.71 Safari/537.36" ...

error_log

2016/05/16 22:11:38 [error] 90674#0: *947302032 upstream timed out (110: Connection timed out) while reading response header from upstream, client: 10.6.19.81, server: **.***.com, request: "GET /api/media_article_list/?count=10&source_type=0&status=all&from_time=0&item_id=0&flag=2&_=1463407896337 HTTP/1.1", upstream: "http://127.0.0.1:8500/**/**/api/media_article_list/?count=10&source_type=0&status=all&from_time=0&item_id=0&flag=2&_=1463407896337", host: "mp.toutiao.com", referrer: "https://**.***.com/articles/?source_type=0"

error_log中upstream timed out (110: Connection timed out) while reading response header from upstream,意思是说,在规定的时间内,没有从header中拿到数据,即uwsgi没有返回任何数据。

502

502主要针对B 、C阶段

产生502的时候,对应的error_log中的内容会有好几种,

access_log

[16/May/2016:16:39:49 +0800] 10.4.31.56 201605161639490100040310562612 2612221463387989972 10.6.19.81 127.0.0.1:88 "GET /articles/?source_type=0 HTTP/1.1" 503 **.***.com **.**.**.4, **.**.**.160 0.000 0.000 "Mozilla/5.0 (Windows NT 6.1; WOW64) AppleWebKit/537.36 (KHTML, like Gecko) Chrome/45.0.2454.101 Safari/537.36" "uuid=\x22w:546d345b86ca443eb44bd9bb1120e821\x22; tt_webid=15660522398; lasttag=news_culture; sessionid=f172028cc8310ba7f503adb5957eb3ea; sid_tt=f172028cc8310ba7f503adb5957eb3ea; _ga=GA1.2.354066248.1463056713; _gat=1"

error_log

2016/05/16 16:39:49 [error] 90693#0: *944980723 recv() failed (104: Connection reset by peer) while reading response header from upstream, client: 10.6.19.80, server: **.***.com, request: "GET /articles/ HTTP/1.1", upstream: "http://127.0.0.1:8500/**/**/articles/", host: "**.***.com", referrer: "http://**.***.com/new_article/"

列一下常见的几种502对应的 error_log:

  • recv() failed (104: Connection reset by peer) while reading response header from upstream
  • upstream prematurely closed connection while reading response header from upstream
  • connect() failed (111: Connection refused) while connecting to upstream

这些都代表,在nginx设置的超时时间内,上游uwsgi没有给正确的响应(但是是有响应的,不然如果一直没响应,就会变成504超时了),因此nginx这边的状态码为502。

上面access_log中为啥是503呢?

这个是因为nginx upstream的容灾机制。 如果nginx有如下配置:

upstream app_backup {                                                                                                                            
    server 127.0.0.1:8500 max_fails=3 fail_timeout=5s;
    server 127.0.0.1:88 backup;
}
  • max_fails=3 说明尝试3次后,会认为“ server 127.0.0.1:8500” 失效,于是进入 “server 127.0.0.1:88 backup”,即访问本机的88端口;

  • nginx upstream的容灾机制,默认情况下,Nginx 默认判断失败节点状态以connect refuse和time out状态为准,不过我们的location里加了这个配置:

 proxy_next_upstream error http_502;                                                                                                                  
proxy_connect_timeout 1s; 
proxy_send_timeout    6s; 
proxy_read_timeout    10s;
proxy_set_header Host $host;                           
  • 这个配置是说,对于http状态是502的情况,也会走upstream的容灾机制;
  • 概括一下就是,如果连续有3次(max_fails=3)状态为502的请求,则会任务这个后端server 127.0.0.1:8500 挂掉了,在接下来的5s(fail_timeout=5s)内,就会访问backup,即server 127.0.0.1:88 ,看下88端口对应的是什么:
server {                                                                                                                                             
    listen 88;
    access_log /var/log/nginx/failover.log;
    expires 1m;
    error_page  500 502 503 504 /500.html;
    location / {
       return 503; 
    }
    location = /500.html {
       root /**/**/**/nginx/5xx/;
    }
}
  • 这个的意思就是,对于访问88端口的请求,nginx会返回503状态码,同时返回/opt/tiger/ss_conf/nginx/5xx/这个路径下的500.html文件。
  • 因此,access_log中看到的是503

499

client发送请求后,如果在规定的时间内(假设超时时间为500ms)没有拿到nginx给的响应,则认为这次请求超时,会主动结束,这个时候nginx的access_log就会打印499状态码。 A+B+C+D > 500ms

其实这个时候,server端有可能还在处理请求,只不过client断掉了连接,因此处理结果也无法返回给客户端。

499如果比较多的话,可能会引起服务雪崩。 比如说,client一直在发起请求,客户端因为某些原因处理慢了,没有在规定时间内返回数据,client认为请求失败,中断这次请求,然后再重新发起请求。这样不断的重复,服务端的请求越来越多,机器负载变大,请求处理越来越慢,没有办法响应任何请求。。

499 这个待补充。。

python多线程使用总结

最近为了提高接口性能,想把串行调用rpc接口的逻辑改成多线程,以达到并行调用的效果。

具体场景: 假设接口A逻辑里会串行调用接口B和C,同时B和C没有数据依赖,现在要把调用B和C的地方改为两个线程分别调用B和C,并分别获取B和C的返回结果。

python多线程简介

python的多线程库有thread和threading两个,threading是高级模块,封装了thread,所以一般都是使用threading。

需要说明的是,python解释器由于设计时有GIL全局锁,导致了多线程无法利用多核,要想利用多核,可以使用多进程。

GIL全局锁(Global Interpreter Lock),任何python线程执行前,必须先获得GIL锁,然后,每执行100条字节码,解释器就自动释放GIL锁,让别的线程有机会执行。这个GIL全局锁实际上把所有线程的执行代码都给上了锁,所以,多线程在Python中只能交替执行,即使100个线程跑在100核CPU上,也只能用到1个核。

多线程使用方式

代码逻辑如下:

class ABC(object):
	def __init__():
		pass
	def A(self):
		...
		resB = self.B(b1, b2)
		resC = self.C(c1, c2)
		return resB + resC
		
	def B(self, b1, b2)
		res = b1 + b2
		return res
		
	def C(self, c1, c2):
		res = c1 * c2
		return res
	

修改为多线程:

import threading
class ABC(objsect):
	...
	def A(self):
		...
		# multi thread
	    threads = []
	    # target 对应要调用的接口名,args对应接口入参
	    t1 = threading.Thread(target=self.B, args=(b1, b2))	  
	    threads.append(t1)
	    t2 = threading.Thread(target=C, args=(c1, c2))
	    threads.append(t2)
	    t1.start() # start()表示启动线程
	    t2.start()
	    t1.join() # join()表示等待至线程终止
	    t2.join()
	    ...
	
	def B(self, b1, b2)
		res = b1 + b2
		return res
		
	def C(self, c1, c2):
		res = c1 * c2
		return res

解释说明:

上面的逻辑中,先依次调用 t1.start() t2.start()表示先分别启动线程t1和t2,然后t1.join()表示检查线程t1有没有执行完,如果没有,则阻塞,直到t1执行完,然后再检查t2。

这种方式有一个问题,接口A里面需要拿到B和C的返回值,上面这种方式,只是调用了B和C,但是没有拿到他们的返回值

多线程传递数据

我们用Queue来实现在线程间传递数据的功能

在python中,队列是线程最常用的交换数据的方式

import threading
import Queue 
queue = Queue.Queue() # 创建一个队列
class ABC(objsect):
	...
	def A(self):
		...
		# multi thread
	    threads = []
	    # target 对应要调用的接口名,args对应接口入参
	    t1 = threading.Thread(target=self.B, args=(b1, b2))	  
	    threads.append(t1)
	    t2 = threading.Thread(target=C, args=(c1, c2))
	    threads.append(t2)
	    t1.start() # start()表示启动线程
	    t2.start()
	    t1.join() # join()表示等待至线程终止
	    t2.join()
		# 从queue中获取返回值
		res_data = []
	    while not queue.empty():
	        res_data.append(queue.get()) 
		for info in res_data:
	        if info.has_key('B'):
	            resB = info['B']
	        if info.has_key('C'):
	            resC = info['C']
	     return resB + resC
	       
	def B(self, b1, b2)
		res = b1 + b2
		'''
		将返回数据插入队列中, 
		为了区分B和C返回的数据,可以返回dict类型,
		key为接口名,value为实际的返回结果
		'''	 
		queue.put({'B':res}) 
		return res
		
	def C(self, c1, c2):
		res = c1 * c2
		queue.put({'C':res})
		return res

通过这种方式,就可以在A中拿到B和C的返回数据了。

另外,还有一种获取线程返回值的方式,可以参考

参考

python多线程

如何获取线程的返回值

git总结——git踩过的坑

主要总结下在实际使用过程中,经常会用到的几个命令

git rebase

应用场景:

比如A和B同时在master分支上修改,A先提交,并push到远程分支origin/master,这个时候,B再提交并push到远程分支时,为了保证代码是当前分支上最新的,就需要先把A修改的部分合并进来。

这个时候可以用git rebase解决

  1. 首先执行git fetch,将远程分支上的内容同步到本地;
  2. 执行git rebase -i origin/master(-i参数表示交互式的rebase),提示如下信息:
  1 pick fbae807 media top level
  2 
  3 # Rebase 0484c1a..fbae807 onto 0484c1a
  4 #
  5 # Commands:
  6 #  p, pick = use commit
  7 #  r, reword = use commit, but edit the commit message
  8 #  e, edit = use commit, but stop for amending
  9 #  s, squash = use commit, but meld into previous commit
 10 #  f, fixup = like "squash", but discard this commit's log message
 11 #  x, exec = run command (the rest of the line) using shell
 12 #
 13 # These lines can be re-ordered; they are executed from top to bottom.
 14 #
 15 # If you remove a line here THAT COMMIT WILL BE LOST.
 16 #
 17 # However, if you remove everything, the rebase will be aborted.
 18 #
 19 # Note that empty commits are commented out

3.退出编辑,如果没有冲突,则提示

Successfully rebased and updated refs/heads/master.

4.如果执行rebase过程中如果遇到冲突,会提示如下信息:

remote: Counting objects: 14, done
remote: Finding sources: 100% (10/10)
remote: Total 10 (delta 7), reused 10 (delta 7)
Unpacking objects: 100% (10/10), done.
From gitr:/***/service/media
   0484c1a..0932a56  master     -> origin/master
   8d7264f..0932a56  test       -> origin/test
First, rewinding head to replay your work on top of it...
Applying: media top level
Using index info to reconstruct a base tree...
M       client.py
M       handler.py
M       server.py
Falling back to patching base and 3-way merge...
Auto-merging server.py
CONFLICT (content): Merge conflict in server.py
Auto-merging handler.py
Auto-merging client.py
CONFLICT (content): Merge conflict in client.py
Failed to merge in the changes.
Patch failed at 0001 media top level
The copy of the patch that failed is found in:
   /***/service/media/.git/rebase-apply/patch

When you have resolved this problem, run "git rebase --continue".
If you prefer to skip this patch, run "git rebase --skip" instead.
To check out the original branch and stop rebasing, run "git rebase --abort".

5.手动合并冲突后,执行git add

6.然后执行git rebase --continue

回退/回滚到上一个版本

git revert changed-Id

changed-Id就是想回滚到的那个版本对应的changed-Id,可以通过git log查看

合并两次提交

比如同一个分支,commit了多次,想把多次提交合并为一个

执行git fetch 然后执行git rebase -i origin/master

  1 pick 18ffe32 new meidia list
  2 pick 72d5cb5 subscribe ui cost optimization
  3 
  4 # Rebase 0f20bfd..72d5cb5 onto 0f20bfd
  5 #
  6 # Commands:
  7 #  p, pick = use commit
  8 #  r, reword = use commit, but edit the commit message
  9 #  e, edit = use commit, but stop for amending
 10 #  s, squash = use commit, but meld into previous commit
 11 #  f, fixup = like "squash", but discard this commit's log message
 12 #  x, exec = run command (the rest of the line) using shell
 13 #
 14 # These lines can be re-ordered; they are executed from top to bottom.
 15 #
 16 # If you remove a line here THAT COMMIT WILL BE LOST.
 17 #
 18 # However, if you remove everything, the rebase will be aborted.
 19 #
 20 # Note that empty commits are commented out
 
".git/rebase-merge/git-rebase-todo" 20L, 681C written

如果想把第二次提交合并到第一次提交上,这边第二行的pick改为squash(合并提交,将这次提交合并到之前的一次提交里面)即可,然后退出编辑,提示如下信息:

Rebasing (2/2)
  1 # This is a combination of 2 commits.
  2 # The first commit's message is:
  3 
  4 new meidia list
  5 
  6 Change-Id: Ie9a37da53dab1e06a95bb8ae7bf70afe87507f9f
  7 
  8 
  9 # Please enter the commit message for your changes. Lines starting
 10 # with '#' will be ignored, and an empty message aborts the commit.
 11 #
 12 # Date:      Thu Jan 28 10:58:22 2016 +0800
 13 #
 14 # rebase in progress; onto 0f20bfd
 15 # You are currently editing a commit while rebasing branch 'master' on '0f20bfd'.
 16 #
 17 # Changes to be committed:
 18 #       modified:   dal.py
 19 #       modified:   urls.py
 20 #       modified:   util.py
 21 #       modified:   views.py
 22 #
 23 # Untracked files:
 24 #       dal.py.1
~                                                                                                                                        
".git/COMMIT_EDITMSG" 33L, 707C written
[detached HEAD c374ca4] new meidia list
 Date: Thu Jan 28 10:58:22 2016 +0800
 4 files changed, 372 insertions(+), 3 deletions(-)
Successfully rebased and updated refs/heads/master.

表示成功的将两次提交合并为一次,接下来执行git push origin master即可。

git基础

git远程分支

git rebase

普吉岛之行

整体5晚7日,就是住宿5天,来回路上各1天,由于去普吉岛是临时决定的,各种没准备,所以报了个团,省事。。

普吉岛是免签的,有护照即可。

出发

晚上8点从济南遥墙机场出发,差不多1个小时到达长沙黄花机场,等差不多2个小时,然后晚上差不多12点起飞,经过约3个小时,到达普吉机场(有1个小时时差,所以到普吉机场大约凌晨4点)。

然后就是办理落地签,不得不说,这边办事比较不着急,等了1个多小时才从机场出来,泰国是小费制国家,需要准备好10元人民币,如果工作人员拦住你,就给钱。。

当地导游已经在机场等我们了,然后跟着导游来到了酒店。到酒店6点多了,然后休息。住的地方挺好,附一张照片

Alt text

第一天

休息了3个多小时,然后起来吃早餐,10点半集合出发。

第一站是一个公园,名字我没记住,整体就是骑大象,然后看猴子表演,再就是看了下橡胶的制作过程。没有特别好玩的;还是要记得给小费,一般给20泰铢。

第二站是坐船到一个地方去吃午饭,这个地方看上去是搭建在水上的,估计跟团在附近玩的,基本午饭都来这里吃了(午饭很难吃,而且不太干净,个人有点小洁癖,所以没怎么吃,还好早饭吃的比较多)。附个图:

Alt text

第三站,吃完饭坐船去007岛拍照,就是经过一下这个岛,都没有下船,没看出来有啥特别的。

第四站,坐着船来到一个坐橡皮艇的地方,2个人一组,坐一会橡皮艇,有师傅帮忙划船,风景还行吧,见下图,最后每人给师傅50株小费。

Alt text

最后就是晚饭了,不得不说,晚饭也不咋样。。

第二天

第二天是最好玩的,都是在水上。早晨8点集合,去做游艇。

第一站,来到天堂湾,这里的水真的挺清澈,穿着救生衣在水里玩,由于本人不会游泳,而且是第一次下水,多亏了导游阿福帮忙,一直抓着我。。。

Alt text

Alt text

第二站,去传说中的pp岛吃饭,饭依旧是不好吃。。

第三站,来到一个类似上午天堂湾的地方,水很清澈,在这里导游教大家浮潜,一定要带好面镜,学会使用呼吸管(这个是我们自己买的,导游说公共的不干净),不然会比较危险,本来我有点小怕,阿福抓着我说不用怕,有我在,呜呜,好感动,鼓起勇气趴下去看了,确实看到好多鱼,不过不小心喝了几口海水,哈哈

第四站,来到情人沙滩,在上面玩了一会,海水特别清澈。

Alt text

第五站就是去岛上住宿的酒店,洗个澡,然后吃晚饭。这个酒店风景也是不错的。晚上吃完饭,跟导游阿福聊天,这小伙特别逗。。

Alt text

Alt text

第三天

其实第三天不太好玩,上午去了海豚岛,这里主要是一些自费的水上项目,包括快艇,潜水等,我基本上就是在海滩上坐了一个上午。。

Alt text

下午5点,去看人妖表演,主要是唱歌跳舞,还唱了几首中文歌,不过很明显都是假唱的。据说整个舞台上不管男女,全是人妖。。。感觉脂粉味太重了,有点接受不了。他们表演完,会在外面等着,如果你想跟他们合影,记得拿小费。。

第四天

第一站,上午去了神仙半岛,风景挺漂亮。

Alt text

第二站,去了一个佛堂,拜了拜佛,泰国95%的人都信佛,去拜佛的时候不能穿短裤和没袖的上衣。到了那里,会有人给你讲解。据说泰国的佛比较灵,如果万一你所求实现了的话,一定要来还愿。

第三站,做了个精油按摩,整体感觉还好吧;

晚上,他们去看了成人秀表演(据说挺恶心),我跟我妹妹没去,俩人溜达着去吃了点当地特色,菠萝饭,还不错,终于吃到好吃的饭了。 Alt text

第五天

第五天基本就是购物了,也没啥景点,最后晚上按摩,按摩完了去机场。

返程

晚上12点多出发去机场,大约凌晨1点左右到机场,然后穿衣服,开始托运,折腾到凌晨4点才起飞,大约凌晨8点到长沙(飞3个小时,1个小时的时差),然后在长沙等到10点多登机去济南,到济南中午12点左右。然后就各回各家了。

tips

  1. 记得给小费,包括酒店住宿,或者玩项目什么的,据导游说,他们那边服务员没有底薪,基本是靠小费生活的;
  2. 酒店的早饭一般还是不错的,所以早晨多吃点,因为午饭和晚饭不好吃;

小结

整体来说,风景还可以,饭太难吃了,跟团就是会带你去一些消费的地方,不过这边到没有强制你必须买东西,只是带你去参观,需要就买。 再就是,我们这次的当地导游阿福,人挺好的,中文说的也挺好,才95年的小孩,刚开始不太熟,后来聊着聊着比较熟悉了,我们就经常逗他,哈哈

python学习——数据类型&编码

基于Python2.7

数据类型

大小写敏感

字符串 ‘’’ abc ‘'’可以表示多行内容

布尔 True、False

空置 None

字符编码

计算机只能处理数字,如果要处理文本,就需要先把文本转换成数字才能处理。

ascii

1个字节表示一个字符(表示范围只能是0~255),支持大小写英文,数字和一些符号

unicode

通常用2个字节表示一个字符(特殊字符4个字节)

utf-8

把unicode编码转换成可变长编码(节省空间),即为utf-8编码。utf-8编码把一个unicode字符根据数字大小编码成1~6个字节,比如英文字母占用1个字节,汉子通常3个字节(特殊字4~6个字节)。 ascii编码可以看做utf-8编码的一部分,所以支持utf-8编码的基本都能支持ascii编码。

unicode与utf-8

在计算机内存中,统一使用unicode编码,当需要保存到硬盘或者需要传输时,则转换成utf-8编码。 比如,打开文本文件时,会将磁盘上的utf-8编码转换成unicode到内存,然后保存文件时,会讲内存中的unicode转换成utf-8保存到文件。

使用

unicode表示的字符串用u'xxx'表示

>>> u'中' //unicode字符
u'\u4e2d'
>>> print u'中文'
中文

编码转换:encode('utf-8')decode('utf-8')

>>> u'ABC'.encode('utf-8') //unicode转换成utf-8
'ABC'
>>> u'中文'.encode('utf-8')
'\xe4\xb8\xad\xe6\x96\x87'

>>> 'abc'.decode('utf-8') //utf-8转换成unicode
u'abc'
>>> '\xe4\xb8\xad\xe6\x96\x87'.decode('utf-8')
u'\u4e2d\u6587'
>>> print '\xe4\xb8\xad\xe6\x96\x87'.decode('utf-8')
中文

说明: u'\u4e2d\u6587'u'中文'是一样的,\u后面是十六进制的unicode编码

格式化

%d 整数 %f 浮点数 %s 字符串 %x 十六进制整数 特殊情况:如果字符串里有%号,则用%%表示一个%

>>>'hello, %s' % 'world'
'hello, world'